 Git Commit 提交规范,变更日志、版本发布自动化和 Emoji 提交标准
# 前言
Git Commit 是开发的日常操作, 一个优秀的 Commit Message 不仅有助于他人 Review, 还可以有效的输出 CHANGELOG, 对项目的管理实际至关重要, 但是实际工作中却常常被大家忽略,希望通过本文,能够帮助大家规范 Git Commit,并且展示相关 Commit 工具库或包,及相关变更日志和版本发布自动化工具
# 规范格式
那么如何能优雅而又不失体面的提交你的代码呢?其实我们的
git commit message是应该具备一些规范的。目前规范用的比较多的是 Angular 团队的规范 (opens new window)
message 样例:
<type>(<scope>): <subject>
<BLANK LINE>
<body>
<BLANK LINE>
<footer>
2
3
4
5
Type:必须是下列之一
- feat:一个新功能
fix:bug 修复
- docs:编辑文档
- style:不影响代码含义的更改 (空格、格式、缺少分号等,不是 css 的更改)
- refactor:既不修复 bug 也不添加特性的代码更改
- perf:提高性能的代码更改
- test:添加缺失的或纠正现有的测试
- chore:对构建过程或辅助工具和库 (如文档生成)的更改
Subject:主题包含对变更的简洁描述
Body:具体的修改内容,可以包括与之前的对比
Footer:通常是 BREAKING CHANGE 或修复的 issue 链接
# 简介
commitizen git commit 格式化工具, 为我们提供标准化的 commit 信息。帮助我们统一项目 commit ,便于信息的回溯或日志的生成。# commit message 格式
commitizen 只是提供一个 commit 格式化或交互工具, 最终需要输出符合 commit 规则的信息给 git,所以需要线了解 commit 格式规则
# 安装
npm install -D commitizen cz-conventional-changelog
package. json 中添加
  "scripts": {
  	...
    "commit": "git-cz"
  },
  "config": {
    "commitizen": {
      "path": "./node_modules/cz-conventional-changelog"
    }
  }
2
3
4
5
6
7
8
9
# 自定义 Adapter
如果 Angular 的规范不符合我们的实际,同样我们也可以通过 cz-customizable (opens new window) 定制一套符合自己或者团队的规范。
npm install -D cz-customizable
同时 package. json 需要修改
"config": {
  "commitizen": {
    "path": "node_modules/cz-customizable"
  }
}
2
3
4
5
之后对应项目目录下创建 .cz-config. js 文件,用来维护自己的格式
官网中有对应的样例配置文件:cz-customizable/cz-config-EXAMPLE.js at master · leoforfree/cz-customizable · GitHub (opens new window)
# 校验 Message
# 工具:
可以做到如果不符合校验规范,就会直接拒绝 commit 请求
# 安装
# Angular 团队的规范
npm install -D @commitlint/config-conventional @commitlint/cli
# 自定义规范
npm install -D commitlint-config-cz @commitlint/cli
2
3
4
# 配置文件
在项目目录下创建配置文件 .commitlintrc. js
Angular 团队的规范
module.exports = {
  extends: [
    ''@commitlint/config-conventional''
  ],
  rules: {
  }
};
2
3
4
5
6
7
# 自定义规范
module.exports = {
  extends: [
    'cz'
  ],
  rules: {
  }
};
2
3
4
5
6
7
# Husky
在做前端工程化时 husky 可以说是一个必不可少的工具。husky 可以让我们向项目中方便添加 git hooks。
官方链接:typicode/husky: Git hooks made easy 🐶 woof! (github.com) (opens new window)
# 安装
npm install -D husky
# 配置
package. json 中添加:
"husky": {
    "hooks": {
      ...,
      "commit-msg": "commitlint -e $GIT_PARAMS"
    }
  },
2
3
4
5
6
或者在 .huskyrc 文件中
{
  "hooks": {
    ...,
    "commit-msg": "commitlint -e $GIT_PARAMS"
  }
}
2
3
4
5
6
# 自动化生成
# 变更日志(Changelog)
[conventional-changelog-cli](conventional-changelog/packages/conventional-changelog-cli at master · conventional-changelog/conventional-changelog (github.com) (opens new window)) 默认推荐的 commit 标准是来自 angular 项目,除了 angular 标准以外,目前集成了包括 atom, codemirror, ember, eslint, express, jquery 等项目的标准,具体可以根据自身需求来选用。
全局安装
npm install -g conventional-changelog-cli
基本使用
conventional-changelog -p angular -i CHANGELOG.md -s
以上命令中参数-p angular 用来指定使用的 commit message 标准,假如想使用 atom 的标准,则是:
conventional-changelog -p atom -i CHANGELOG.md -s
参数 -i CHANGELOG.md 表示从 CHANGELOG.md 读取 changelog, -s 表示读写 changelog 为同一文件。需要注意的是,上面这条命令产生的 changelog 是基于上次 tag 版本之后的变更(Feature、Fix、Breaking Changes 等等)所产生的,所以如果你想生成之前所有 commit 信息产生的 changelog 则需要使用这条命令:
conventional-changelog -p angular -i CHANGELOG.md -s -r 0
其中 -r 表示生成 changelog 所需要使用的 release 版本数量,默认为 1,全部则是 0
自定义参数
生成的 changlog 中有些常用内容可以通过自定义参数来根据需求更改,例如版本号、commit 地址等等。 changelog 中生成的版本号即是从 package.json 中获取 version 字段来的。commit 连接的仓库地址我们需要修改 package.json 中的 repository 地址,changelog 中 issuse 默认的连接地址也是根据 repository 来生成的。如果你使用了第三方的协作系统(例如 bitbucket),那么你可以使用这个标准conventional-changelog-angular-bitbucket (opens new window)。或者像我们使用 redmine 来管理 isssue ,那么在生成 changelog 后可以使用 replace (opens new window) 工具来处理文本中的原有地址:
replace 'https://github.com/myproject/issues/' 'https://redmine.example.com' CHANGELOG.md
更多配置: https://github.com/conventional-changelog/conventional-changelog/tree/master/packages/conventional-changelog-core
# 版本发布
我们可以使用 standard-version 实现版本发布自动化
全局安装
npm install -g standard-version
执行
standard-version
执行 standard-version 命令,我们会在控制台看到整个执行流程的 log 信息,在这里几个常用的参数需要注意下:
# --release-as, -r 指定版本号
默认情况下,工具会自动根据 主版本( major ),次版本( minor ) or 修订版( patch ) 规则生成版本号,例如如果你 package.json 中的 version 为 1.0.0, 那么执行后版本号则是:1.0.1。自定义可以通过:
$ standard-version -r minor output 1.1.0
$ standard-version -r 2.0.0 output 2.0.0
$ standard-version -r 2.0.0-test output 2.0.0-test
需要注意的是,这里的版本名称不是随便的字符,而是需要遵循 语义化版本( semver) (opens new window) 规范的
# --prerelease, -p 预发版本命名
用来生成预发版本, 如果当期的版本号是 2.0.0,例如:
$ standard-version --prerelease alpha output 2.0.0-alpha.0
# --tag-prefix, -t 版本 tag 前缀
用来给生成 tag 标签添加前缀,例如如果前版本号为 2.0.0,则:
$ standard-version --tag-prefix "stable-" output tag: stable-v2.0.0
以上这几个参数可能我们用的比较多,还有其他选项可以通过 standard-version --help 查看。
# 集成 npm
最后记得把命令集成到 npm package.json 的 scripts 中, 并配合 shell 脚本使用, 如下:
"scripts": {
  "release": "./scripts/release.sh",
  "changelog": "conventional-changelog -p angular -i CHANGELOG.md -s -r 0 && git add CHANGELOG.md && npm run changeissueurl",
  "changeissueurl": "replace 'https://github.com/myproject/issues/' 'https://redmine.example.com/' CHANGELOG.md"
},
2
3
4
5
配置好后使用 npm run 执行发布
$ npm run release
# 添加 release.sh 脚本:
#!/bin/bash

while [[ "$#" > 0 ]];
do
    case $1 in
    -r|--release) release="$2"; shift;;
    # -b|--branch) branch="$2"; shift;;
    -t|--tag-prefix) prefix="$2"; shift;;
    -p|--prerelease) prerelease="$2"; shift;;
    -n|--no-verify) no="true"; shift;;
    *) echo "❌❌❌ Unknown parameter passed: $1"; exit 1;;
    esac; shift;
done

# Default as minor, the argument major, minor or patch:
if [ -z "$release" ]; then
    release="patch";
fi

echo "👌🏻 Release as $release"

# Default release branch is master
# if [ -z "$branch" ] ; then
#     branch="";
# fi;

# if [ "$branch" ];
# then
#     echo "✔ Branch is $branch"
# else
#     echo "✔ Branch is current branch"
# fi;

# git pull origin $branch
# echo "✔ Current pull origin $branch."


# Generate version number and tag
if [ "$no" ]
then
    standard-version --no-erify --infile CHANGELOG.md
    echo "👌🏻 no-erify"
else
    standard-version -r $release --tag-prefix $prefix --prerelease $prerelease --infile CHANGELOG.md
fi;

git push --follow-tags
echo '✅ git push success'

npm publish

echo "🎉🎉🎉 Release finished."
2
3
4
5
6
7
8
9
10
11
12
13
14
15
16
17
18
19
20
21
22
23
24
25
26
27
28
29
30
31
32
33
34
35
36
37
38
39
40
41
42
43
44
45
46
47
48
49
50
51
52
53
上面的脚本只是做了简单的分支 pull, 执行 standard-version 和最后的版本 push 工作,如果要做一些定制化的执行参数,则需要做定制修改了
# Emoji 提交
在 git commit 上使用 emoji 提供了一种简单的方法,仅通过查看所使用的表情符号来确定提交的目的或意图, 得提交记录非常好理解,阅读体验非常棒。
git commit 时直接在注释中写入表情符号的代码部分即可完成表情 emoji 的提交
$ git commit -m ':tada: init commit'
# Emoji 指南
| emoji | emoji 代码 | commit 说明 |
|---|---|---|
| 🎉 (庆祝) | :tada: | 初次提交 |
| 🆕 (全新) | :new: | 引入新功能 |
| 🔖 (书签) | :bookmark: | 发行/版本标签 |
| 🐛 (bug) | :bug: | 修复 bug |
| 🚑 (急救车) | :ambulance: | 重要补丁 |
| 🌐 (地球) | :globe_with_meridians: | 国际化与本地化 |
| 💄 (口红) | :lipstick: | 更新 UI 和样式文件 |
| 🎬 (场记板) | :clapper: | 更新演示/示例 |
| 🚨 (警车灯) | :rotating_light: | 移除 linter 警告 |
| 🔧 (扳手) | :wrench: | 修改配置文件 |
| ➕ (加号) | :heavy_plus_sign: | 增加一个依赖 |
| ➖ (减号) | :heavy_minus_sign: | 减少一个依赖 |
| ⬆️ (上升箭头) | :arrow_up: | 升级依赖 |
| ⬇️ (下降箭头) | :arrow_down: | 降级依赖 |
| ⚡️ (闪电) | :zap: | 提升性能 |
| 🐎 (赛马) | :racehorse: | 提升性能 |
| 📈 (上升趋势图) | :chart_with_upwards_trend: | 添加分析或跟踪代码 |
| 🚀 (火箭) | :rocket: | 部署功能 |
| ✅ (白色复选框) | :white_check_mark: | 增加测试 |
| 📝 (备忘录) | :memo: | 撰写文档 |
| 📖 (书) | :book: | 撰写文档 |
| 🔨 (锤子) | :hammer: | 重大重构 |
| 🎨 (调色板) | :art: | 改进代码结构/代码格式 |
| 🔥 (火焰) | :fire: | 移除代码或文件 |
| : pencil 2: (铅笔) | :pencil2: | 修复 typo |
| 🚧 (施工) | :construction: | 工作进行中 |
| 🗑 (垃圾桶) | :wastebasket: | 废弃或删除 |
| ♿️ (轮椅) | :wheelchair: | 可访问性 |
| 👷 (工人) | :construction_worker: | 添加 CI 构建系统 |
| 💚 (绿心) | :green_heart: | 修复 CI 构建问题 |
| 🔒 (锁) | :lock: | 修复安全问题 |
| 🐳 (鲸鱼) | :whale: | Docker 相关工作 |
| 🍎 (苹果) | :apple: | 修复 macOS 下的问题 |
| 🐧 (企鹅) | :penguin: | 修复 Linux 下的问题 |
| 🏁 (旗帜) | :checkered_flag: | 修复 Windows 下的问题 |
| 🔀 (交叉箭头) | :twisted_rightwards_arrows: | 分支合并 |
注:我使用的是 Obsidian ,可能是和主题皮肤有关系,emoji 是不能实时预览的,可以安装插件 Icon Shortcodes (opens new window) 解决
# Emoji 提交标准
默认情况下,在命令行中并不会显示出 emoji, 仅显示 emoji 代码。不过可以使用 emojify (opens new window) 使得在命令行也可显示 emoji, 它是一个 shell 脚本,安装与使用都很简单
Windows 安装
curl https://raw.githubusercontent.com/mrowa44/emojify/master/emojify -o /usr/bin/emojify
配置 Path 环境变量
PATH=/usr/bin/
命令行使用
emojify "Hey, I just :raising_hand: you, and this is :scream: , but here's my :calling: , so :telephone_receiver: me, maybe?"
或者你可以在 git log 中替换日志中的表情符号代码
git log --oneline --color | emojify | less -r
交互式客户端
gitmoji 交互式客户端 gitmoji-cli (opens new window) ,解决了搜索 gitmoji 列表的麻烦,还有很多选项可以自行探索
# 安装
npm i -g gitmoji-cli
# 使用帮助
gitmoji --help
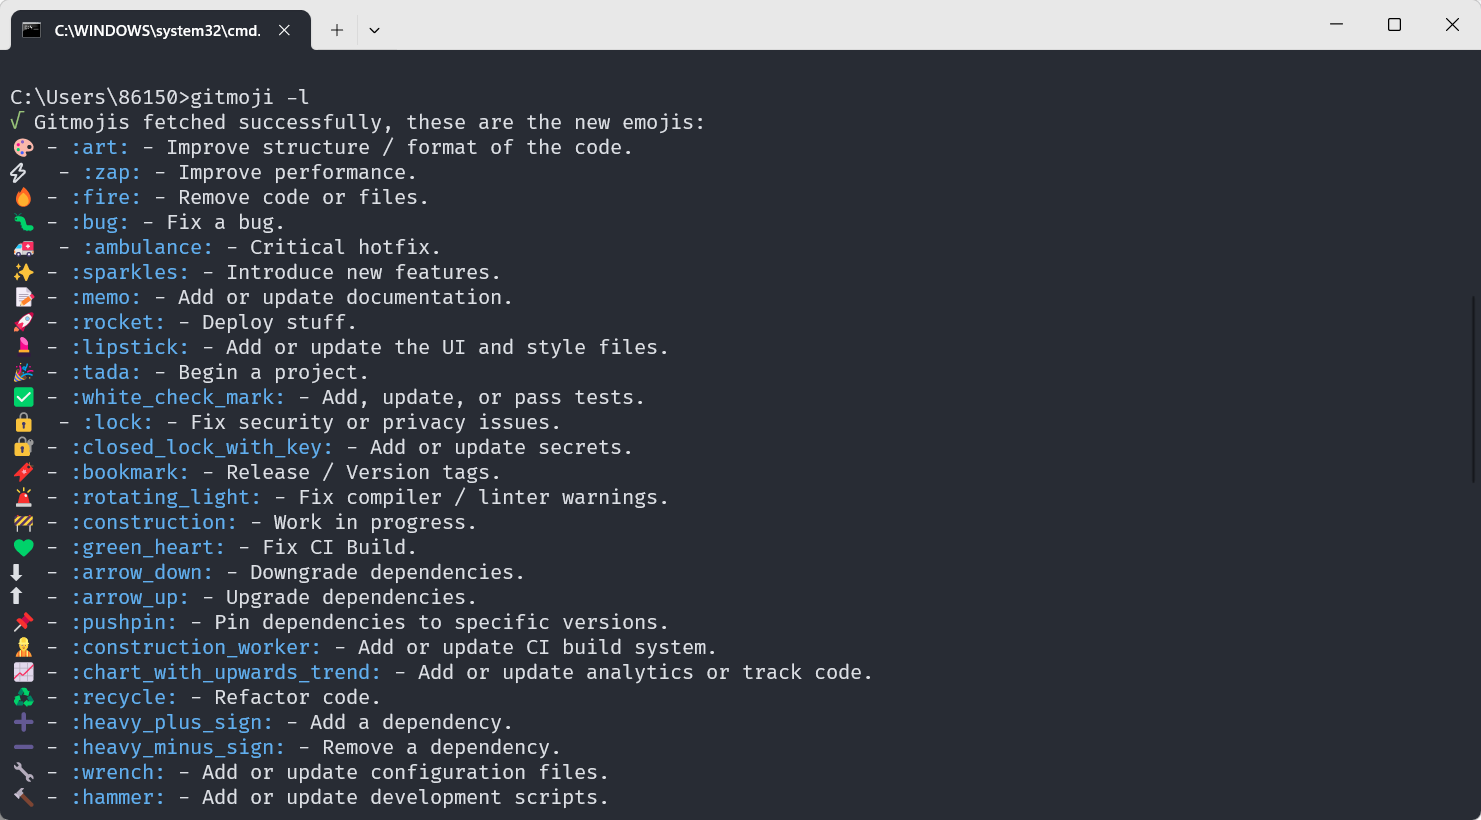
# 查看表情列表
gitmoji -l
2
3
4
5
6
# 参考链接
- git commit 规范 、CHANGELOG 生成 和版本发布的标准自动化 - 掘金 (juejin.cn) (opens new window)
- git commit 、CHANGELOG 和版本发布的标准自动化 - 掘金 (juejin.cn) (opens new window)
- Commit message 和 Change log 编写指南 - 阮一峰的网络日志 (ruanyifeng.com) (opens new window)
- 【推荐】git commit 规范和如何在 commit 里使用 emoji-阿里云开发者社区 (aliyun.com) (opens new window)
- liuchengxu/git-commit-emoji-cn: 😁 git commit message emoji 使用指南 (github.com) (opens new window)